
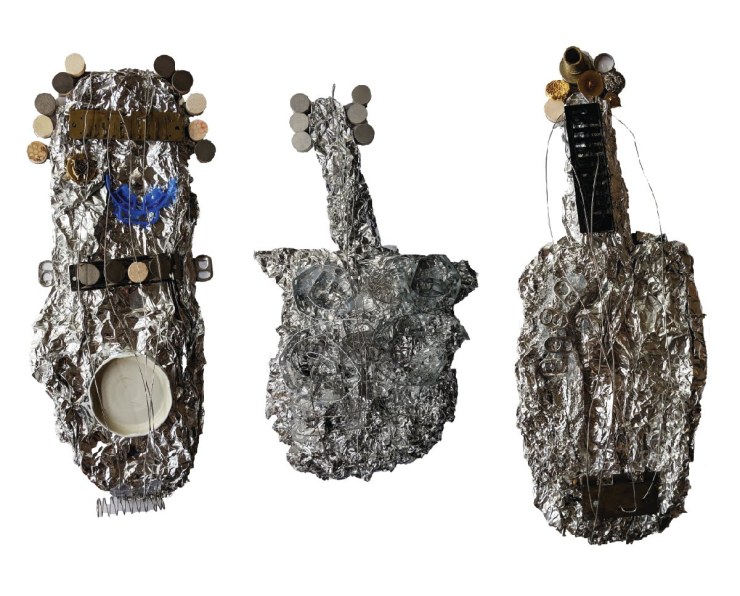
Over the course of many months, the Gold Room students, their Art Specialist, Music Specialist, and Classroom Teachers worked in collaboration on a deep exploration of string instruments. What began as a simple, curious question about a damaged bass in the Music Studio, grew into an epic journey to design, modify, and construct working musical instruments. Throughout the 2018-19 school year, the Gold Room explored community and frequently showed interest in building activities. While their collaborative building in the classroom provided ample opportunity to practice and develop interpersonal skills, these construction projects always held an element of impermanence, as they would be deconstructed soon after they were built. Together, the teachers and specialists set goals to have the children explore building something of permanence, and through collaboration and consensus, make decisions as a community.
These goals, coupled with the students organic interest in fixing a stringed instrument, lead to an extended art project that cultivated community, created consensus, and ultimately lead to the children building three original string instruments.
Agreeing to embark on this journey required reflection about where students were heading together. Early in their work to design these instruments, the Art Specialist facilitated a conversation with students to define criteria for their creations.
- They need to be “real.”
- They have to sound and look beautiful.
- They need to be able to withstand being played by many children.
These criteria governed the project throughout the weeks together. And during each phase of exploration, students reflected on what was needed for modification as they moved closer to building their music makers.
In these reflections, students learned about setting criteria, goals, and common agreements. They were given time to think logically about what works and what does not work as they move from two dimensional drawings to three dimensional models and learn about what materials get what results. And throughout these practices to negotiate, discuss, listen, and share, students exercised collaboration and community.
The children of the Gold Room began their preliminary work for making instruments in the string family. Their previous undertakings in the Studio exploring construction, collaboration, and three dimensional to two dimensional work paved the way for this long-term and complex endeavor.

We began by looking at and discussing blueprints as a way to help formulate getting our ideas onto paper. Many of the children had ideas about what blueprints are, like a map and a city. One said, “It is a city because it has so many boxes and words”. After talking about the blueprints and reading the book, If I Built A House, by Chris Van Dusen, the children came to the understanding that blueprints are “directions” and “instructions”. We used this framework to think about how we might create stringed instruments – now working 2d to 3d.
“These knobs are important. It’s the part that turns the strings.”
“We need to put these rainbow things on to hold the strings on.”

Initially starting with a banjo-type design, one student decided to add strings going in different directions at the instrument’s bottom. He then drew the shape with the bumps on it. When questioned about that image, he explained, “This instrument makes this kind of sound. It goes BAA bum BAA bum”.

“This instrument should be made from wood and rubber. You need the wood to press the strings down so they sound different. You need the rubber so the sound bounces like the notes I made.”
“We need to make the inside of the instrument. We might need to figure that out.”
“How are we gonna put this together? I think we need glue to keep it in place. But, if the strings break, we wouldn’t be able to get them off. So, maybe only glue on some parts like wood, or if it breaks. Right?”

Part of our process became revisiting and refining the designs as we looked for ways to combine them together into three final blueprints. Our practice of “creating studies” before our final drawing helped the children to think critically about what they like about their work and what they would change. This process can be easily seen through one student’s first and second designs, where he was able to put those changes to paper.

After completing the drawings, we revisited the idea of creating and using blueprints with the intention of combining the individual drawings into a more cohesive and collaborative plan. The children examined their work from the previous week and chose which elements they wanted to include in their first collaborative draft.
The children explored a guitar and two non-traditional stringed instruments as a way to help them think about the mechanics of the instruments and what possible types of materials they might use when they begin the building.
Prior to beginning the larger group drawing, the children decided how their chosen elements could fit together. They discussed the shape of their instrument and what they felt was important to include.
“I really like my handle top part.”
The team of five gave approval of the final ideas before they took turns creating and adding to the larger image.
“We forgot about those circles! They’re important ‘cause I think you put your fingers there. Guys, should I put them in?”
As each group came to the studio and started their collective drawing, they began to make statements and share their ideas about what these instruments would sound like. They wondered if they would be loud or more quiet or if they might be able to change the volume of the instrument if they used it in different ways.
“I want it to sound so so beautiful.”
Another topic of conversation that each group discussed, was the importance of the instruments they create being “real”. When questioned about this, the children had a few different ideas about what this meant though, surprisingly, each group communicated some common ideas. To be “real,” the instruments would need to withstand many children playing with them, and they needed to be made with strong materials.
“When we make our real instrument, we’ll have to make the bottom part first and then put the decorations and strings on.”

With the designs complete, the children worked in their groups to begin exploring how their instrument designs could take form.
The intention behind using clay first for this was to help the children think about the individual parts of the instrument- separate from the whole design and also, the sequence of actions that might be required when we do the actual build. By using the clay to create a replica, they began to understand their designs on a different level. They realized that they might need to refine their ideas a bit and that there is a process or “a recipe” to making the instruments a reality.
“I’m thinking that the size of this might need to be a bit bigger when it’s wood. The handle isn’t long enough.”

The children worked together to create their collaborative clay pieces, sometimes organizing the work by where they were located around the table and other times, choosing the area they drew on the 2d blueprint. As they created their base, they covered the reference photo of their plan. As a result, they needed to use another photo to be able to add the details specific to their design.


The children discussed possible materials that their instruments could be made of, and the benefits of using certain materials over others. New to this conversation was talk about how it would all stay together. The clay work caused them to think about how other materials “don’t just stick together like clay” and that they would need to include things like glue and paint in their materials list.
We decided to try a variety of materials as we puzzled out together what would be the best to use for the instruments. We also took the time to learn about and safely explore the various tools that can aid us in the construction.
After our clay explorations, time our focus was exploring loose parts that are made of metal. After spending some time examining the different pieces and discovering how they could be manipulated, the children began to try out their ideas on their instrument plans. They would take turns testing things out, refine their ideas, and then try something new. Each groups’ work was shared with the following group and this helped generate new ideas about the work.

After deciding that their metal work was finished, one group examined their work and compared it to their design plan to decide if they wanted to edit or add anything. From their examination, this group came to the conclusion that metal would not be their material of choice. “We can’t make our instrument out of metal ‘cause we won’t be able to see the strings.”
“This is going to look so awesome! A super shiny instrument. Right?”
“Some of these are different. Some are the same of the scraps. We need to put them together like when we’re making something like a building. They need to fit all together, I think. All metal might be too heavy.”

From this exploration, the children came to the conclusion that their overall form should be made from something that was not metal, though the small metal pieces each group used was perfect for the instruments’ knobs. They also seemed to feel that the wire and spring strings did not work for their purposes.
Before we began working with cardboard, the children viewed excerpts from a short YouTube documentary of violin maker, Galen Hartley making his 21st violin. His use of tools and how he created form from drawings on wood, helped the children remember our conversations about the tools we might use in our own builds, and the many discussions we had about possible materials and their different properties. The children noticed how carefully and slowly he worked, and recognized that our own work may take a long time.
“He’s using that tool to take the lumps out of the wood!”

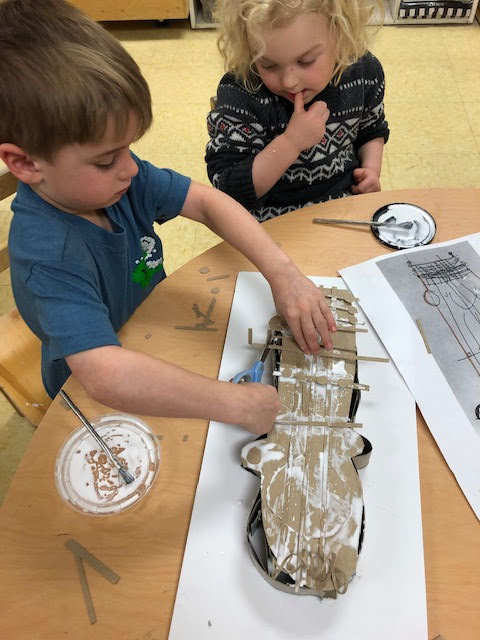
Next up in our process towards making the instruments from wood is to explore making prototypes out of cardboard of different thicknesses. We chose cardboard as it has the ability to emulate how we might use wood in our final production of the stringed instruments.
“I have an idea about how we can make the swirls out of wood…we have to put it around that metal thing like that guy, and use clamps and glue.”
After the children watched how Hartley molded thin strips of wood and glued them into shape, they began to make the correlation to how they might use the cardboard. Prepping the cardboard to use for our next build took a lot of time…the children needed to consult with their plans to determine what kinds of shapes they might require. They used templates, t-squares, rulers, scissors, and cardboard saws to measure and make the materials ready for next time.

“It’s like we’re making a cake…we’re getting all the ingredients together first.”
“Our instrument has a lot of different parts. I think we need to make a lot of different shapes of cardboard. This will probably be good practice.”
“I’m making the inside of the instrument ‘cause if it’s curly inside like this… the instrument will make like…ballet music that’s kind of swirly.”
The children remembered that he used thin strips of wood that he bent and formed into the outside and inner chambers of the violin. Using his method, the children began building.

There were many areas of this work that challenged the children and provided them with opportunities to problem solve. They needed to work with the cardboard strips that they measured and cut, and they had to figure out how to form them into the shapes from their design.
They used clothes pins to hold the strips of cardboard together and they discovered that if they held the cardboard down on the foam core board for a few minutes, the glue would activate.

One student experimented with different ways to make the cardboard curve. First, he tried using a dowel to roll the strips into a coil. He found that when he did this, it produced folds rather than the “smooth wave” that he was going for. Then, he discovered that if he curved it into an arch and moved it (think about holding each end of a slinky and moving each hand independently), he could achieve the curve he wanted.
Working on the instruments’ inside structures caused the children to think about how it might effect the sound an instrument could produce. Two students discussed their instrument’s chambers in detail, and wondered if the sound could “get trapped”. They very purposely altered the inside pieces of cardboard so that the sound could “travel from room to room and not get stuck”.

After creating and completing the bottoms, sides and resonating chambers of the three string instruments, next the children worked on applying the instruments’ faces and details. This took quite a bit of patience and precision, as well as paying close attention to the details from their original two dimensional plans.
One student placed the instrument’s face on top of it’s resonating chamber. She realized she needed to hold the cardboard down for a few minutes so that the material wouldn’t curl. “We should put something on this to hold it down until it’s dry.”
The children were again challenged to figure out ways to manipulate the cardboard to create the details that they made in their plans. They remembered the documentary about Galen Hartley and reflected on his process of making his violins. They recalled that he didn’t use nails or screws to put his violins together, and they made the connection from his process to their own.
“If he used screws, it might make the violins sound different. I think that’s why he only used glue. I think we should only use glue, too.”
The children added the details of their instruments’ bridges, strings, fingerboards, and their tuning pegs. They cut and trimmed the cardboard and shaped it to create gentle curves and design spirals. They counted the number of strings they needed to include, and they determined the orientation of curves, lines on the fret-boards, and placement of the tuning knobs. They looked closely at their references, and they made changes and alterations in their materials and in their work to fit in all of elements that they drew.

After studies in all those materials, we began to investigate how we might make the sides of the collaborative instruments. We needed to experiment and find our way using materials like thin planks of wood. We discussed that we were at a point in our work where we had to think about how to use the “real” materials, and based on what we discovered, we might need to revise our plans or the manner in which we worked. The children were particularly excited to begin working with wood- it marked a new place in our building.
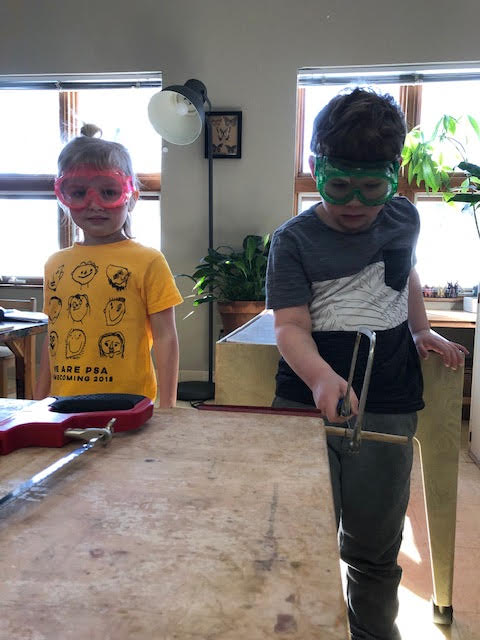
To start, the children learned about a variety of woodworking tools. Before we tried them all out, we examined the tools and discussed their names, what each is used for, and how to use them in a safe way.
Though we did not expect to use all the tools we explored, it was important that the children learn about and experience every aspect of that ongoing process. Their discussion about and desire for creating “real” instruments necessitates the use of real tools.

“I think we are really ready to make the real instruments ‘cause we almost figured out how to do it!”
We reflected on Galen Hartley’s violin-making process, and the children knew that he used the pegs and pegboard when gluing the sides to the body of the instrument. They also knew that water can help to form the wood and make it easier to shape the wood into a curve, but we needed to pegs to hold the wood to form. We ran into a few challenges along the way… the children soon discovered that the drill bits we were using were slightly smaller than the pegs…making it difficult to pound them in. Each group faced this challenge and when asked if they had ideas how to solve it, each group suggested a different solution.
The children created the pegboards and shaped the wood planks which formed the sides of their collaborative instruments. We used a lot of different tools while making the pegboard foundations and the children came to the studio in smaller groups so that the focus (both for the students and the teacher) would be on using these tools safely. This work took a lot of effort; we needed to measure and saw 72 pegs, drill 56 holes, hammer the pegs into place, and then carefully bend the wood onto the foundation. The children took this all in stride and expressed excitement in this new part of our process.
“This is so exciting, right guys? It’s finally happening and we finally are using all these tools together!”
“This drill is so heavy, right? It’s a strong drill, and I’m a strong girl. I could do anything with this, I bet. Build houses, castles, instruments. This is so fun. I never knew I’d do this before.”
“We need to drill more like put it in the hole and swirl it around so it gets bigger.”


The drilling of the pegboard holes took a lot focused attention. Though a few of the children tried drilling the holes, the bulk of this important work was done by just two students. They needed to make sure the holes were drilled straight and deep enough so that the pegs would fit and not fall out.

After the first set of pegs went in, the next step was for the children to gently and slowly curve the wood and fit it onto the pegboard. The children discovered was how the placement of their pegs set the curve of the wood. One groups’ first attempt at bending and placing the plank caused the plank to crack in the middle. Very carefully, they chose another piece of wood.
“This is so cool! Right? We get to do real things with real tools.”

This proved to be very challenging- they had to work together in their movements, moving very thoughtfully and in sync with each other. This was an interesting thing to observe; the children had to watch each other carefully and communicate openly to each other about what they were doing.
When the wood was finally placed, they hammered in the second set of “inside” pegs to hold the plank straight up and down.

One groups’ first attempt at bending and placing the plank caused the plank to crack in the middle. Very carefully, they chose another piece of wood.
“Hey! I think I know why it cracked! This piece doesn’t work because it’s not wet enough.”


With the instruments’ sides formed into their unique shapes, our next step was to attach the back panels of the instruments. The children worked to apply thin layers of wood glue to one edge of the side panels and then fit them onto the cut back pieces.
From our research, the children and I discovered that some instrument makers use slightly larger front and back panels and then sand them (or carve them) into the precise shapes of their designs.
We decided to use this method as it would give us a little bit of wiggle room as we worked to complete the builds. Some of the instruments required some clamping to keep the sides within the confines of the back panels. Each group examined their pieces thoroughly to determine if clamping or weighing down would be necessary while the work dries. They then rechecked for spaces between the side and back panels.
Since this work required periods of waiting for drying time- we also worked on other aspects of the instrument build. Each group had to make decisions about their instrument’s finish, it’s hardware, and what they want to call or name their stringed piece. To begin these conversations, the children looked at a book of complex directions for building stringed instruments. I asked them what they noticed about the photographs and diagrams in the book. And their observations and ideas helped to decide our next steps.

Student: What happens if the glue goes down the side? Will it wreck the instrument? We want this to be beautiful.
Student: I think if we are careful that won’t happen. Maybe we could go slow and if the glue gets on, we can wipe it off fast.
After these conversations, one group noticed that their piece didn’t have a neck that looked “guitar style”. After examining the photos and discussing their design and build, the group determined that they would continue on with their plan as is. They discovered a photo of a stringed instrument which more resembled their work.
The children examined a guitar brought in from the music studio and had noticed it’s smooth seams. They worked on filing and sanding down the bottom edges all around the outside of their instrument.
The filing took quite a bit of muscle power, so the children took turns between filing and sanding.
“This makes my hand tickle a little bit.”

When it was time to start forming the instruments necks, and to make the seams flush, they used a variety of sharp tools (saws, rasps, and hand planes).
Having measured and chosen the pieces of wood for the necks last week, the children took turns sawing the hard wood down to size. This specific work took a lot of time and required a lot of patience.

“It takes a long time to do this, doesn’t it? I didn’t know how long it would take before. You have to use a lot of tools, and think hard about what you’re doing. Sometimes we make some mistakes but that’s okay. Then, we know how to make it better.”
“This is important work. We’re making these for the Gold Room but the whole school, too. My little brother will be able to use this and his friends in the Snowflake Room will too. Friends from all over. That’s how you can tell it’s good and it’s important.”
Reflecting on the many months of work by these children, I am struck by their “stick-to-itiveness” and by their ability and interest in doing a good job. They still talk about their instruments being real and their definition of this has perhaps been fueling their desire to see their work through to completion.
Next, the children began their work on their instruments’ sound holes. To start, they consulted their revised plans to determine how big the holes should be on the wood and where on the front panel the hole should be placed.

After one student used a template to draw out the sound hole, another drew small circles all around the inside. These served as guidelines for where the children would drill their holes.

“It’s a good thing you have that big wood underneath because I’m so strong, I’d drill through the table!”
“That little bit of wood is keeping this all together. Even if it goes that way around the circle, it will be stuck there. We’ll need to use another tool to get it out.”
This perceptive comment touched upon our next step…to use a keyhole saw to cut through and around the circle.


Finishing up the instruments still involved a lot of hard work that needed to be completed before the children could begin putting their instrument’s pieces together. This included paring down some of the back and side pieces so that the front panels will match up when the instruments’ necks are attached, and sawing, trimming up, and sanding the front panel sound holes.
“We gotta do this right. It won’t sound so good if it doesn’t fit together.”
“We need to be safe and go slowly, right?”
“It has to be smooth and it has to feel good in your hand, right?”

This work took a lot of muscle power and patience and the children took turns working for a bit and then switching their tasks with each other.
We also spent time examining different hardware for the different designs. A donated autoharp gave the children a clue to how one of their designs might look with strings attached. They looked closely at the way the strings were attached to the pegs and how there were little nails by the pegs to keep the strings in place.
“You know what? I still can’t believe we’re making REAL instruments. I feel proud of that.”
Even after working on their instruments for many months, they seemed very excited to get down to it, and they recognized how much closer they were to completing this long project.

“These are the things to hold the strings on? They’re really long. The wood is pretty skinny. We should put some wood on that part to make it not so skinny.” At this suggestion, the children examined the instrument whose design does not include a neck and agreed that the best course of action in attaching the zither pins was to cut and glue sections of wood to the front panel for added stability. This took some time as the children needed to measure, set up the tools, and cut through the hard wood pieces.
Along with attaching the front panels, the children also took time to work on forming the necks of the other two designs. This has taken a very long time as the children have been using the chisels and sandpaper to create a “comfortable in the hand” form. With all of them working together, we made a lot of progress!

When it came time to place the front panels, the children remembered their work attaching the side forms to the back. One student recalled how when the pieces dried, they discovered gaps between the sides and the back panels which we needed to re-glue and clamp.
“Hey, you know what? We need to put those clamps all around so there isn’t any spaces for the music to leak out. It only should go out the sound hole on the top, right? And…if there are spaces, people might think they are broken.”

While the clamps were all in use securing the sawing and chiseling areas, two students came up with a solution to weigh down the top panels until we could use the clamps…“I have a good idea! We can use these!”

Once the front panels were secure, the children worked to mark and drill the holes needed for the instruments’ various hardware. While doing this, we discovered that the necks for two of the instruments were too thick for the tuning hardware to work properly. For the two instruments that have necks, it was back to the drawing board to figure out and find adequate wood pieces. This information caused the children to brainstorm and reflect on what to do as we have spent a lot of our time forming the handles with chisels and sandpaper. Reflecting on this, one student said “Sometimes you make a mistake and that just tells you to do it over in a better way”.
The children took some time to drill holes to determine the proper bit sizes for the hardware and the correct thickness of wood planks. They compared the thickness of the wood to wood used on a ukulele. Through this, they were able to discover what we needed to look for in neck pieces. They used rulers and templates to mark the areas for drilling.

After drilling all of the holes for one of the instruments, the children took turns pounding in the zither pins which will hold the strings in place.
“This is really really hard to do. You have to use your muscles. Why is it harder than putting nails in again? I forgot. Oh, yeah…the holes are a tiny bit smaller than this pin.”

The children worked to attach the final wooden pieces to their instruments, including instrument necks and supports, top panel closures, and the fingerboards for two of the instruments. We also spent time reviewing their individual drawings of their instruments that showed their ideas about the finish colors and color placement. They tested out two different mediums, liquid watercolor and acrylic ink, to see if either medium would be a better choice to use over the other.
With the acrylic ink, one student mixed the ink with water on the palette to create different hues and tints which he applied in stripes as marked by the lines he drew down his board. He explained, “I want to keep the colors separate so we can really see them not mixed all together. We can make a better decision that way”.

Some of the children decided to explore what would happen if the two mediums were used together on the same piece of wood. One student’s chosen combination of cobalt blue and teal watercolors with gold acrylic ink was a beautiful combination.
“Like a beautiful peacock!”
He showed the sample to his tablemates who agreed that these colors in this combination should definitely be present on the instruments. Another student said to him, “You’ve got a really good eye!”

At last, it was time to add color to the “real” stringed instruments and the children were very excited. They decided that they liked certain colors in acrylic inks and others in liquid watercolor. They also decided that they would like to try to use a combination of both paint types, but in order to do so, they needed to think about how and where to apply them. One group had the idea that each member of each group should decide on an area to apply color and “not go anywhere else, right?”. This allowed for the space and drying time of the two different kinds of paint so that the layering of color in their drawn designs could be possible.

“They need to look and sound beautiful. I guess that’s one we can cross off our list!”
“I bet in the whole world, people have never seen instruments like this before!”
“I think that it might not even need rainbows because of all the sparkles. I wonder what we should call this instrument? It’s not all the way a guitar. I’ll think about it.”

The last steps before the bridges and finish could be applied were to finely sand the instruments and wipe away the debris. They also needed to bag and tape the instruments in order to paint the resonant chambers without disturbing the finishes they created on their pieces. The children recognized that we are nearly to the end of this long-term project, and as they worked, they spontaneously reminisced about our journey and process.
After a discussion about color harmony, the first group of children were invited to choose between colors that were complementary or analogous (colors that are next to each other on the color wheel) for the instruments’ resonant chambers.

Student: I can’t believe we’re almost done. When did we start this? The wood part, I mean. Not the preparing parts to get ready for wood. I think we should make a car next!
Student: Yes! Let’s make an automobile. I really, really think we could do it.

“I wonder what these instruments will sound like. Maybe… maybe… like a beautiful song. Remember when we cut the wood and sawed and everything? I liked the drill part, and the making the instrument part. And, we did it, ourselves!”
The children took to these final steps before they apply the hardware and strings with a joyful, yet reverent demeanor. I believe they recognize the immensity of what they have worked towards and accomplished. As I reflect on the conversation that making a car is a possibility, I am overwhelmed by the thought of what this project, it’s scope and complexity, have opened up for the children. They understand that they are capable of wondrous and wonderful things, that their ideas can become reality, that they can negotiate, refine, revise, make mistakes and create things of great beauty. And most importantly, they never believed otherwise. They never waivered or questioned their abilities.
Finally, it was time to finish the instruments by adding the tuning peg hardware, the nuts and bridges, and the instruments’ strings. We were met by quite a few challenges as doing these things ended up being trickier than we initially thought and wrong sized strings made it impossible to complete the zither-like instrument.

After discovering that the strings wouldn’t work for us, one student suggested that we try wire instead so that we could get a sense of the sounds the instrument could produce. His suggestion prompted us to cut wire and restring the instrument. However, when we tried to tune the wires, they began snapping one by one.
“Looks like it’s back to the drawing board!”
Tiny screws hold the tuning pegs in place. To get them in, the children first needed to pound divots into the wood using a very sharp awl. After attaching the pegs, the instruments were flipped over to put together the pieces of the pegs from the other side. This took a lot of focus and a steady hand.

After correcting and finishing up the stringing, it was time to hear what these could do. The children were able to explore them in many ways and with objects such as picks, a bow, and a capo. Remembering their original criteria, the children expressed their desire for their instruments to sound as beautiful as they look.
“That sounds awful and screechy! We gotta tune this quick!”
“You know what? I really love this instrument.
This work took almost a year to complete! But, reflecting on this and even that term “stick-to-itiveness” allows for there to be the idea that the children were just along for the ride. This couldn’t be further from the truth, and in fact, they were the ones propelling this work and they never once wavered.

As we wrapped up our work with the stringed instruments, it was important to have the time to reflect on our journey and reexamine the work that the children had done in the very beginning of our process. We took the time to look over each groups’ original plans to discuss and compare them to the finished instruments. We talked about the design choices the children made along the way, and their decisions to add or eliminate elements in the actual pieces. Since their designs were so different from their finals, the children drew these individually and added the color as they look now. Beginning in two dimensions and returning there…our process has come full circle.

The children looked closely at the instruments and focused on capturing the details of their work. They carefully recreated the variations in color that they noticed in their instruments.
“This was the first drawing and then we made the drawing with the hole and now we’re doing the real one. It’s pretty different. Remember when I wanted it to be only red? It’s only a little bit red now. Red is my favorite but now it has other colors too. Those might be someone else’s favorite. We’re all in this together, right?”

Reflecting with the children about their work, I was struck at how aptly the children are able to discuss and label and communicate their feelings and thoughts about their process. This was a big endeavor for all of us! They have learned many things while making these, tangible things and things not readily seen by looking at or hearing the instruments. Instead, I am thinking of all of the negotiating, disappointing set-backs, and the patience to see things through. Things that will stay with them as they move on to new adventures outside of PSA. I couldn’t be prouder.
Reflection by Kelly Blondin, Art Specialist
You must be logged in to post a comment.