
Over the summer, the Green Room had an interest in making treasure maps. The teachers thought, but what is the actual treasure? In the art studio, coins seemed like a good starting point that would prompt observations and would allow for individual expression.
We shared a little about what we knew about treasure. Then we looked at real coins and coin images with magnifying glasses and talked about what we noticed-symbols, numbers, colors, decorations- and why we thought those things were on coins.
“Treasure is deep, deep in a big hole and you have to dig to find it.”
After looking at coins, the mission was to create our own treasure coin showing something that we “treasure” or something that is special to us. Many children drew their favorite toys or activities.

Next, we added some sparkle and shine to our treasure! There were a few steps to the process- painting, gluing and taping. We began by talking through the plan, discussing the different materials and techniques for each step. The end goal may have been decorative but the experience was also about practicing using the right tools the right ways, working sequentially and as usual expressing our individuality!


After completing our treasure coins, many of the children were excited to learn about how and when we would hide the treasures. The next step was to create a map of the area we would be hiding them in, our school! Our intention in exploration was to discover how the children conceptualize the spaces in our school and to give them a chance to be cartographers of a place that most of them know how to move around in with ease. This was also a great opportunity for us to take our exploration outside of the studio and to move around while creating.
We began by looking at some images to get familiar with the unique view that map making requires. We talked about the term “birds eye view” and how things look different from above. We enjoyed looking at photos of different scenes from a birds eye view and identifying what they were.
“This is like from an airplane and you look down out of the window!”

We began in the piazza, drawing an outline of the borders of our school and placing the round piazza on the map first. Most children agreed that the piazza should go in the middle of their map.

I loved hearing the details that the children thought everyone should include- some counted the number of lights, some drew the benches and many wanted to add the portraits. This is clearly a well-loved and known space for the children.

Although many of the maps began in a very similar way, as we explored the hallways the maps diverged in a multitude of unique ways. It was interesting to observe which rooms and details of the school the children chose to include (or not include) in their maps and what shapes they chose to represent hallways and classrooms.
Dry erase markers proved to be just the right medium, allowing the children to erase and change their maps as they moved around the building. Many times they discovered more details and needed to make space or change where they had originally placed a room.
The children also seemed to simply enjoy the process of working on a clipboard and erasing using the eraser on top of the marker cap- something they see teachers do all the time on tracking sheets! The end results of our map making exploration are a mix of abstract and realistic. How fun and fascinating to see PSA from their perspective!

The following week, the teaching team chose to take the whole group on a field trip to a geocache close to PSA to continue our exploration of observing and defining treasure as well as map making. As the geocache website states, “Join the world’s largest treasure hunt!”- it seemed like a perfect mission for the Green Team to be a part of.
One of the elements about geocaching that we discussed was that we could take something but we also needed to leave something behind for the next person to find.
We gathered for a morning meeting to discuss all the details of our geocaching mission. We looked at the geocache GPS map and the children were immediately interested and excited by the idea that there is so much treasure all around us in Madison that other people have hidden!

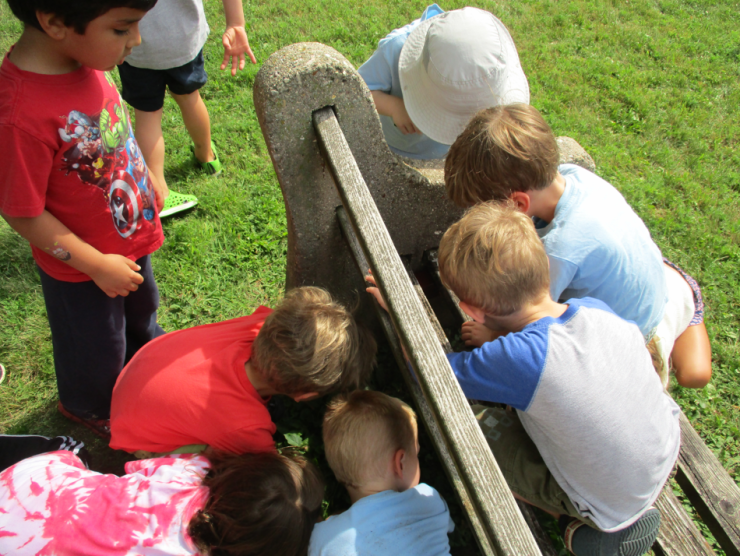
When we got to the park, we searched high and low for the geocache. Once we had exhausted all of our ideas about where the treasure could be hiding, we consulted the geocache GPS which acted as a “warmer/colder” gauge and told us how close (or far) the treasure was from where we were standing.

Amy, one of the co-teachers, helped us think about how to measure distance. What did it mean when the GPS told us we were “6 feet” away? How big is a foot?
We finally spotted something wedged in the bench and called over friends to help get it out! We opened a tiny wooden box to find…. a plastic cow along with a geocache logbook! We left behind a seahorse, and signed the log book.
On our walk back we brainstormed the possibilities for our own PSA geocache, I look forward to exploring this further with the Green Room children during our final studio session together of the summer.
After our geocaching adventure, the children were familiar with all the elements that go into making this special kind of treasure- a logbook, a container, a good hiding spot, an interesting item to find, etc. In brainstorming what our treasure should include, one student said “love!”-what a good idea! But how do we put love in a box?
A heart-shaped treasure box found in the art studio was slick and shiny (and very red) so we first worked together make a few changes to the outside. We added some gold paint and glued some treasures on.

An important element of geocaching that we learned about was the logbook- a place for each person who finds the treasure to leave a note. Because the theme of our geocache is “Love in a Box”, we decided that each child could draw a picture of something they love to start off the logbook.

Each group helped brainstorm where in the school our geocache should be hidden. We talked through lots of considerations for the location… in a shared space for all of PSA, a spot where it was hidden from sight, something that kids could reach, somewhere protected from the weather, etc…
Once we had chosen our super secret hiding spot, it was time to draw a treasure map to show PSA how to find our geocache! Our map making exploration earlier in the summer helped us think about how to draw a map from a “bird’s eye view” and include details that would give clues to the treasure hunter.

Reflection by Johanna KaLhoun, Summer Art Specialist
You must be logged in to post a comment.